


"Pipes are simple functions to use in template expressions to accept an input value and return a transformed value. Pipes are useful because you can use them throughout your application, while only declaring each pipe once."
To create a pipe, we will use this command in our terminal.
ng generate pipe <pipe-name>
Alternatively, you can also type "ng g pipe".
We will see the following pipes in this article:
String Pipe
JSON Pipe
Currency Pipe
Number Pipe
Date Pipe
Custom Pipe -> Which we will create on our own; the rest are in-built
String Pipe:
A string pipe is used to perform some operations on strings. We will pass the string to the pipe and then some kind of operation will be performed on it. Let us see the below example.
<h4>String Pipes</h4>
<div>{{ message | lowercase }}</div>
<div>{{ message | uppercase }}</div>
<div>{{ message | titlecase }}</div>
<div>{{ message | slice: 10:25 | uppercase}}</div>
In the TS file, we have the message variable declared:
message = "Starting Angular Pipes"
And the output we get is:
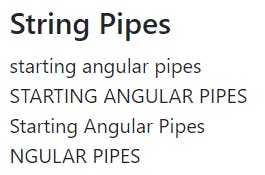
As you can see on line one, we have asked the pipe to make the message in lowercase format. Similarly, there are other operations to modify the string as shown. Apart from case operations, we can also slice the string and simultaneously make it uppercase too; that means we can assign more than one pipe also.
JSON Pipe:
It takes the data in JSON format and then performs certain operations on it. Let us look at the below example. We have the following data in TS file in JSON format which we will pass to the JSON pipe.
emp = {
    id: 1001,
    name: "ABC",
    post: "Engineer",
    salary: 35000,
    address: "Pune"
  }
In HTML, to use JSON pipe, we will write:
<h4>JSON Pipes</h4>
<strong>{{emp | json}}</strong>
And the output we get is:

As you can see, we have passed the word "json" to it along with the name of the array we used in the JSON file.
Currency Pipe:
A currency pipe is used to perform currency-related operations for instance working with currency signs. Take the example of any e-commerce site such as Amazon. For the currency sign to display on the UI of the website, you wouldn't change the sign manually all around the hundreds of HTML files. Using a simple pipe, we can specify the currency type depending on the region the user is situated. As location changes, the pipe tends to be updated and prices are altered too.
price = 9999 // TS file
<h4>Currency Pipes</h4>
<div><strong>{{ price | currency }}</strong></div>
<div><strong>{{ price | currency:"INR" }}</strong></div>
<div><strong>{{ price | currency:"GBP" }}</strong></div>
The first row will be the one with a default value. In the second and third lines, we are specifying the type of currency. We will get the following output.

Have a look at the changing currency signs. That is what we are doing, modifying the data.
Number Pipe:
As the name suggests, we can perform operations on numbers regarding decimal places, commas, etc. Take a look at an example below:
<h4>Number Pipes</h4>
<div>{{ 910 | number }}</div>
<div>{{ 910 | number:'2.2' }}</div>  <!--Before and after decimal places. If we put 5.2 as first number, the output: 00910.00-->
<div>{{ 910 | number:'5.2' }}</div>
And the output we obtain is:
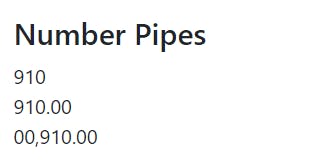
Number pipes are useful in representing numbers in different formats.
Date Pipe:
Similar to numbers, the format of Date is also different in different parts of the world. Well to make things compatible for users depending on their region, we can also represent data in different formats to suit their needs. Take a look at the below example:
myNewDate = new Date() // Takes the current date and time instance
<h4>Date Pipes</h4>
<div><strong>{{ myNewDate }}</strong></div>
<div><strong>{{ myNewDate | date }}</strong></div>
<div><strong>{{ myNewDate | date:'shortDate' }}</strong></div>
<div><strong>{{ myNewDate | date:'longDate' }}</strong></div>
<div><strong>{{ myNewDate | date:'mediumDate' }}</strong></div> <!--Same as only date-->
And the output we obtain is:
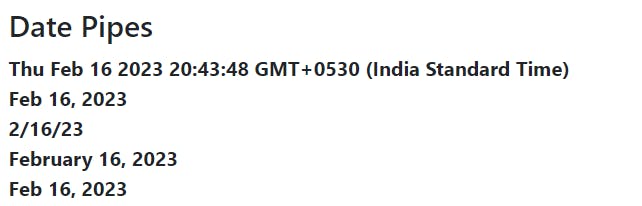
Shortdate and Longdate are different ways to represent data too. The first line output will differ from region to region. By default, the date is in MediumDate format.
Custom Pipe:
Ok, enough of playing with the in-built pipes. Let us make our pipe and perform the operations we desire. Fire up the following command in your terminal.
ng generate pipe ../custom-pipe/gender
Please note you can have any name for your pipe. I have used the "custom-pipe" folder and in that I have named my pipe as "gender" in my case. This will give us 2 files:
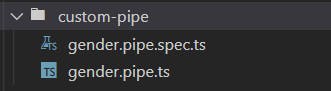
Please note, we will not be doing anything with the spec.ts file. Our main code will be inside the .ts only.
What we will be doing is we will create a table of students. If the student is male, automatically "Mr." should be joined in front of the name. Likewise for females, "Ms." should be appended at the beginning.
This is the data from the.ts file which we will be using
students = [
    {id:1001, name:"Allan", gender:"Male", address:"London", contact:"9898989898"},
    {id:1002, name:"Bob", gender:"Male", address:"Paris", contact:"94565789898"},
    {id:1003, name:"Carol", gender:"Female", address:"Spain", contact:"9898980008"},
    {id:1004, name:"Davis", gender:"Female", address:"London", contact:"1298989898"},
    {id:1005, name:"Elmer", gender:"Male", address:"USA", contact:"5410989898"},
    {id:1006, name:"Frank", gender:"Male", address:"Germany", contact:"9999989898"},
    {id:1007, name:"Grace", gender:"Female", address:"London", contact:"1298981680"}
  ]
In HTML, we make arrangements to display the table.
<h4>Custom Pipes</h4>
<table class="table table-striped">
    <thead>
        <tr>
            <th>ID</th>
            <th>Name</th>
            <th>Gender</th>
            <th>Address</th>
            <th>Contact</th>
        </tr>
    </thead>
    <tbody>
        <tr *ngFor = "let s of students">
            <td>{{ s.id }}</td>
            <td>{{ s.name | gender:s.gender }}</td>
            <td>{{ s.gender }}</td>
            <td>{{ s.address }}</td>
            <td>{{ s.contact }}</td>
        </tr>
    </tbody>
</table>
As you can see we have applied the name of our pipe, which in our case is "gender" specifically applied to the name, as we have to perform an append operation on that particular field.
Later in the class of file gender.pipe.ts file, we write:
transform(value: unknown, genderValue: string): unknown {
    if(genderValue.toLowerCase() == "male"){
      return "Mr. " + value;
    }
    else{
      return "Ms. " + value;
    }
  }
The logic is simple as seen. Now let us have a look at the output:

See the name column. We didn't specify "Mr." or "Ms.". It has been updated according to our logic code which we wrote in the .ts file of our gender pipe.
Similarly, we can create many such custom pipes and write the logic according to which we want the pipe to present the data to us.
Thus we learnt about pipes in angular.