Day 2: MongoDB - Getting Started with MongoDB

Developer based in India. Passionate learner and blogger. All blogs are basically Notes of Tech Learning Journey.
MongoDB provides numerous advantages as compared to RDBMS. But to use MongoDB, we need to install it on your machine. So let us set up MongoDB in our system so that we can use it.
Visit the MongoDB website (mongodb.com) and navigate to the "Downloads" section.
Choose the appropriate version of MongoDB by clicking on Choose a package for your operating system and clicking on the download button.
Once the download is complete, run the installer and follow the on-screen instructions to install MongoDB.
After the installation is finished, add the MongoDB bin directory to your system's PATH environment variable.
Test the installation by opening a new terminal window and typing "mongod" to start the MongoDB server.

Here when you enter any command, and you get output, it means that MongoDB is successfully installed. It will also ask you to add MongoDB Compass, which you can install too. The usage of MongoDB Compass and MongoDB Atlas has been discussed in our Node and Express blog series.
If you want to perform MongoDB operations via the command line, then you can also install Mongo Shell. You will find the download link here. Once you download it, it will be a zipped file. Extract it inside the "C:/Program Files/MongoDB". Later on, copy its path of the "bin" folder and add it to the "Path" system variable.
For detailed installation and guidelines, I have followed this tutorial video and this has helped me a lot. The link to the video is embedded below:
This video explains the detailed installation and setup of MongoDB Compass (if you want to do MongoDB operations in GUI format) and Mongo Shell (Mongo operations using Command Prompt).
To set up MongoDB on your system, choose your preferred IDE. Create a folder with "package.json". In most of the cases as we make use of NodeJS, type the command "npm install mongodb". Also, initialize the "package.json" with the command "npm init".
For the ones who want to perform queries on Mongo Shell, Open the Mongo Shell application. Paste the connection string.

The connection string which I pasted was obtained from my MongoDB Compass application. This was the same cluster we created earlier for the NodeJS blog series and as you can see, we have been able to see all the databases inside it. Now here we can perform some CRUD applications via Mongo Shell.
Introduction to the MongoDB Shell:
The MongoDB shell is a powerful command-line interface that allows you to interact with the database directly. It provides a JavaScript-based environment to execute queries, perform administrative tasks, and explore the database structure. To access the MongoDB shell, open a new terminal window and type "mongo" followed by the necessary connection details. In another way, you may install Mongo Shell from the same link we used above and directly double-click on the application. It will ask you for a connection string, which you can obtain with MongoDB Compass. Now we will look into some basic queries we can do on Databases, Collections, etc.
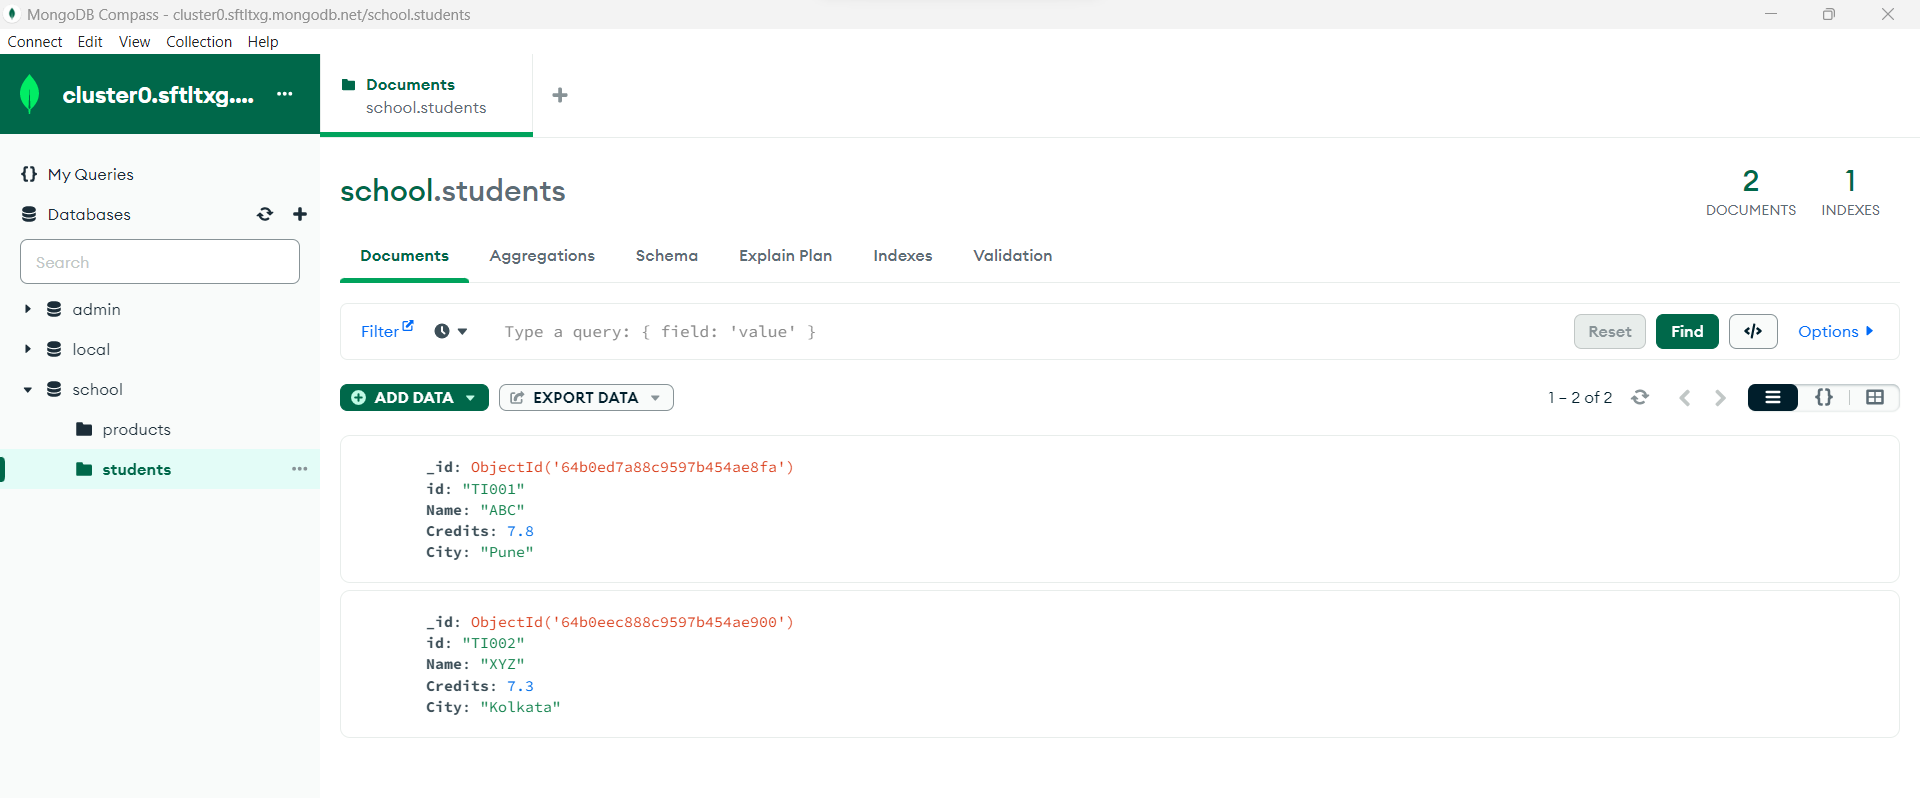
Referring to the above image, I want to use the school database. Then I will type the following command:
Atlas atlas-m4zqrn-shard-0 [primary] test> use school
switched to db school
Atlas atlas-m4zqrn-shard-0 [primary] school>
As you can see in the output, we have been switched to the "school" database. If you want to confirm that which database you are actually using, you can type this command:
Atlas atlas-m4zqrn-shard-0 [primary] school> db
school
To drop this database, we will use:
db.dropDatabase()
We will not be dropping this database anytime soon so I am just writing down the command to do so.
As you know Collections are equal to Tables. We already know that there are Collections under the School Database. To view the collections, we type the following command:
Atlas atlas-m4zqrn-shard-0 [primary] school> show collections
products
students
Now I want to add the data in the Collection named Student. To do so we will type:
Atlas atlas-m4zqrn-shard-0 [primary] school> db.students.insertOne({"id":"TI001","Name":"ABC","Credits":7.8,"City":"Pune"});
{
  acknowledged: true,
  insertedId: ObjectId("64b0ee9e88c9597b454ae8ff")
}
Atlas atlas-m4zqrn-shard-0 [primary] school> db.students.insertOne({"id":"TI002","Name":"XYZ","Credits":7.3,"City":"Kolkata"});
{
  acknowledged: true,
  insertedId: ObjectId("64b0eec888c9597b454ae900")
}
We always get the acknowledge message after the successful insertion of a record in a Document. We can see the result right away after a refresh.
In simple terms, this is a "Create operation" i.e. C of CRUD. Similar to "insert()" there are "insertOne()" and "insertMany()" methods. If you need to insert only one document into a collection you can use the "insertOne()" method. What we did above was insert one element at a time, now we will try to insert the multiple documents.
Atlas atlas-m4zqrn-shard-0 [primary] school> db.students.insertMany([{"id":"TI003","Name":"DEF","Credits":9.3,"City":"Mumbai"},{"id":"TI004","Name":"KLM","Credits":8.2,"City":"Hyderabad"}])
{
  acknowledged: true,
  insertedIds: {
    '0': ObjectId("64b0fe2588c9597b454ae901"),
    '1': ObjectId("64b0fe2588c9597b454ae902")
  }
}

To read the documents, we use the following command:
Atlas atlas-m4zqrn-shard-0 [primary] school> db.students.find();
[
  {
    _id: ObjectId("64b0ed7a88c9597b454ae8fa"),
    id: 'TI001',
    Name: 'ABC',
    Credits: 7.8,
    City: 'Pune'
  },
  {
    _id: ObjectId("64b0eec888c9597b454ae900"),
    id: 'TI002',
    Name: 'XYZ',
    Credits: 7.3,
    City: 'Kolkata'
  },
  {
    _id: ObjectId("64b0fe2588c9597b454ae901"),
    id: 'TI003',
    Name: 'DEF',
    Credits: 9.3,
    City: 'Mumbai'
  },
  {
    _id: ObjectId("64b0fe2588c9597b454ae902"),
    id: 'TI004',
    Name: 'KLM',
    Credits: 8.2,
    City: 'Hyderabad'
  }
]
Thus you can see that we have retrieved the Documents in the Collection. This is the basic read operation i.e. R from CRUD.
Suppose, I want to update the data of some Document, then I will use the following function:
Atlas atlas-m4zqrn-shard-0 [primary] school> db.students.update({"id":"TI003"},{$set:{"id":"BN114"}})
{
  acknowledged: true,
  insertedId: null,
  matchedCount: 1,
  modifiedCount: 1,
  upsertedCount: 0
}
We have updated the ID field of one of the Documents. Let us see if it worked or not.
Atlas atlas-m4zqrn-shard-0 [primary] school> db.students.find();
[
  {
    _id: ObjectId("64b0ed7a88c9597b454ae8fa"),
    id: 'TI001',
    Name: 'ABC',
    Credits: 7.8,
    City: 'Pune'
  },
  {
    _id: ObjectId("64b0eec888c9597b454ae900"),
    id: 'TI002',
    Name: 'XYZ',
    Credits: 7.3,
    City: 'Kolkata'
  },
  {
    _id: ObjectId("64b0fe2588c9597b454ae901"),
    id: 'BN114',
    Name: 'DEF',
    Credits: 9.3,
    City: 'Mumbai'
  },
  {
    _id: ObjectId("64b0fe2588c9597b454ae902"),
    id: 'TI004',
    Name: 'KLM',
    Credits: 8.2,
    City: 'Hyderabad'
  }
]
Have a look at the third record. The ID has been successfully changed and thus indicating we have performed the Update operation. Now if we want to remove a document, we will use the remove() method. We need to specify the ID of the Document which we want to delete.
Atlas atlas-m4zqrn-shard-0 [primary] school> db.students.remove({"id":"BN114"})
Atlas atlas-m4zqrn-shard-0 [primary] school> db.students.find();
[
  {
    _id: ObjectId("64b0ed7a88c9597b454ae8fa"),
    id: 'TI001',
    Name: 'ABC',
    Credits: 7.8,
    City: 'Pune'
  },
  {
    _id: ObjectId("64b0eec888c9597b454ae900"),
    id: 'TI002',
    Name: 'XYZ',
    Credits: 7.3,
    City: 'Kolkata'
  },
  {
    _id: ObjectId("64b0fe2588c9597b454ae902"),
    id: 'TI004',
    Name: 'KLM',
    Credits: 8.2,
    City: 'Hyderabad'
  }
]
As you can see, the record in which the ID was specified was removed. So here we complete our Delete operation. We will be looking at various other queries in further blog posts. The aim of this blog was to demonstrate the CRUD operations in MongoDB.


