Day 3 : Angular - Data Binding Concepts

Developer based in India. Passionate learner and blogger. All blogs are basically Notes of Tech Learning Journey.
Introduction
Today we will try to understand the different concepts used under data binding in Angular. Data Binding is a concept to pass our data (in other words binding our data) between the template (HTML file) and the class (TS file).
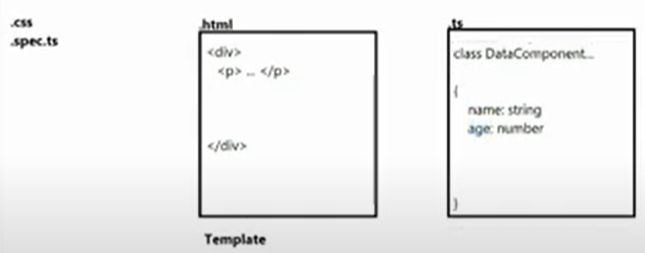
As seen in the above image, when a component is created, 4 files are created: .css, .spec.ts, .html and .ts. The HTML file is also known as Template. The class will be present in the TS file.
There are 4 types in which we can do data binding:
1. Interpolation    {{ }}      ts => html
2. Property Binding [ ]        ts => html
3. Event Binding    ( )        html => ts
4. Two way Binding  [( )]      ts <=> html, here we use the ngModel directive
Interpolation:
This means the data will go from the TS file to the HTML file. For the data to be displayed from TS to HTML, we specify the data inside {{ }} this.
For example:
Inside the class of the TS file, I have this code snippet:
username = "Admin"
age = 32
I need to display this data on the page. For that this is what I will do:
<p>Welcome {{ username }}</p>
<p>You are {{ age }} years old</p>
This will produce the following output:

Property Binding:
Property Binding is almost as same as Interpolation with a slight change. We will discuss the difference later in this article but first, let's see an example of Property Binding.
Suppose, I have an image somewhere in my project. I will specify its path in the class inside the TS file as:
imgPath = "../../../assets/images/img21.jpg"
In HTML we do this:
<img [src]="imgPath" alt="nature" height="300px" width="300px">
We will get the desired result which is the image will be displayed.
So as Interpolation and Property Binding look the same, then what is the difference between them? The difference can be elaborated with the help of the following example.
<input type="text" name="" id="" disabled="{{isDisabled}}">
<input type="text" name="" id="" [disabled]="isDisabled">
The "isDisabled" variable is present inside the class of TS file.
isDisabled = false // in other words, not disabled i.e ENABLED
Before diving into the explanation, let's see the output:

As you can see the first text box uses Interpolation and the second text box uses Property Binding. Yet the first one will remain disabled. Yes, you read it right. Thus, even though Interpolation and Property Binding seem the same, it is to be noted that Interpolation should be avoided when there are boolean values to do some work. Use Property Binding when using Boolean values.
Event Binding:
Event Binding usually refers to when the data from the HTML file goes into the TS file. To understand Event Binding, let us look at the example:
In HTML, suppose we have a button:
<button (click)="btnClicked()">Click Here</button>
In the TS file, we will have to implement the above function:
btnClicked(){
    alert("Thank you for clicking the button")
}
The thing is inside the () circular bracket, we will have to specify which event we need to bind. In this example we are using the "click" and after the event is handled, which function is to be executed, which will be specified in the TS file.
Two-Way Binding:
Typically refers to both types i.e HTML -> TS as well as TS -> HTML. Let us understand with an example:
In the TS file, we have:
myName = "AdminName"
<form>
    <label>Enter your name Admin :- </label>
    <input type="text" name="name" id="" [(ngModel)]="myName">
    {{ myName }}
</form>
Observe closely that we have specified ngModel directive here. Your application will give you an error straight away regarding the use of ngModel. To remove the error, make sure FormsModule is imported into your app.module.ts file. This should resolve the error.

Anyway the output we will be getting is a text box and whatever name it takes inside it, it will display next to it. We have displayed the data via Interpolation, just to make sure our code works. We can edit the name too. Whenever we change the data in the text box, the data beside it will change too.
Reference Variable:
It is a different concept. We can give any variable a reference name (preceded by #) and use it anywhere. For example:
<input type="text" name="" #myInputBox>
<button (click)="showMsg(myInputBox.value)">Show Message</button>
showMsg(msg:any){
    alert(msg);
  }
TS will only handle the event. The output will be a text box and a button. Whatever we write in that text box, will be displayed in the form of an alert at the top of the web page, once we click the button.
Hence we learned property binding and reference variables today.


