Day 4 : Angular - Structural Directives

Developer based in India. Passionate learner and blogger. All blogs are basically Notes of Tech Learning Journey.
In Angular, the basic use of directives is to change the DOM layout, appearance or behavior.
There are 3 structural directives:
ngFor
ngIf
ngSwitchCase
We will be seeing each of these directives with an example.
For starters, you may create a separate app or just create a new component inside the existing app with the name as directives.
ngIf:
This directive works as an "if" in programming languages. As we are aware, in programming languages, if the condition is true, then and only then the part under the if statement will be executed. Similar is the case here with the ngIf directive.
I assume you have created a directives component and you have got the 4 files created as I have mentioned in my previous articles.
<h4>Demonstration of ngIf directive</h4>
<p *ngIf="boolVal; then one; else two"></p>
<ng-template #one>   <!--It will not be rendered (displayed) by default, so we need to it a ID-->
        We are inside ng-template 1 (IF -> TRUE)
</ng-template>

<ng-template #two>
        We are inside ng-template 2 (ELSE -> FALSE)
</ng-template>
boolVal: boolean = false; // TS file
Before heading more in-depth, let us understand the above example. In the HTML file, we are saying to ngIf that if the value of the boolVal variable (which is in the TS file assigned manually) is true, show the section with ID as "one" else display the one with ID as "two". As the value is false, the second section will be displayed.
But not yet, there is one more thing to understand. The ng-template is an element given by Angular. The fun part is that if we simply mention <ng-template> and then something inside the tag and close it, the content will not be displayed (rendered) on the page by default. For the content to be accurately visible, we need to specify a reference name as we have done in the above example. This reference name is used to display the contents inside <ng-template> on the webpage.
We will get the following output
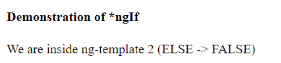
If you change the value in the TS file from false to true, then you will see another section.
ngFor:
As the name sounds, it is similar to the "for" loop in programming languages, or we can say they are a bit similar in working.
<h4>Demonstration of *ngFor</h4>

    <div *ngFor = "let br of berries">
        {{br}}
    </div>

    <ol>
        <li *ngFor = "let br of berries">
        {{br}}
    </li>
    </ol>
berries = ["Acaiberry","Blueberry","Cranberry","Dewberry","Elderberry","Foxberry","Gooseberry"] // TS file
As we can see we have created one array named "berries" and inserted some elements into it. We are iterating or we can say traversing through every element.
We will get the following output:
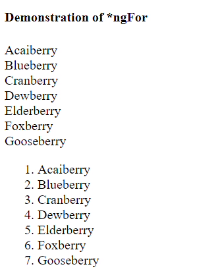
As you can see, we can print the items from the array. We have used Interpolation for the same, which I have covered in previous blogs.
ngSwitchCase
It works like a switch case as the name suggests.
<h4>Demonstration of *ngSwitchCase</h4>
<div [ngSwitch] = myChoice>
        <div *ngFor = "let b of berries">
            <div *ngSwitchCase="b"> You Selected {{b}} </div>
        </div>
    <div *ngSwitchDefault>Please select a valid option</div>
</div>
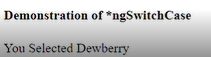
myChoice = "Dewberry"
We are once again iterating through every element in the array. But the catch is that we are assigning some value to a choice variable. If that value matches the value in the array, it will be printed, or else the ngSwitchDefault will be executed.
For bringing the choice variable from TS to HTML, we have used Property Binding and for printing purposes, we have used Interpolation to demonstrate the use of this directive.
Thus we have learnt about directives today.


