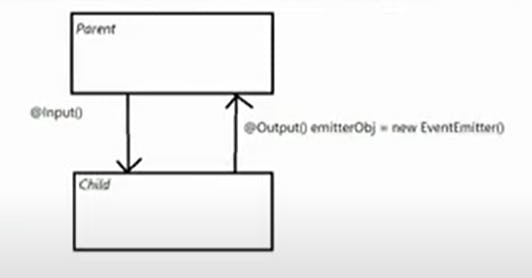
The use of Input and Output Decorators is usually handy when sending data between two components when they have a parent-child relationship. Interaction between components is highly possible when they are related like this. To establish a parent-child relationship, we use a child component selector in the parent component.
To make things good, we will create two components:
ng g c parent
ng g c child
Parent-to-Child Interaction:
Sending data to a child from a parent is relatively easy. In the HTML of the parent component, we will use a form that consists of a text box to input the message text and a button, when clicked will send the message.
{{ childData }}  <!--Message from the child will be displayed here-->
<form>
    <label>Send a Message from Parent to Child : </label>
    <input type="text" name="" #pMsg>
    <button class="btn btn-primary" (click) = "getMsg(pMsg.value)">Send Message
</button>
</form>
<app-child></app-child> <!--Child component inside the parent-->
In the TS file, we will declare the necessary variables and implement the required methods.
myData : any;   // To store parent's data
childData : any;    // To store child's data
getMsg(value:any){
    console.log(value);
    this.myData = value;
  }
Now we will go to the child component. We have implemented the logic to send the message to the child, but he will not get the message until Input Decorator is used. So in the TS file of the child:
// pData is a property associated with parents property
  @Input()
  pData: any
And finally, in the HTML of the child element, we will print the data i.e message we receive from the parent.
<strong>{{ pData }}</strong>
When we do so, the text we enter in the textbox will be displayed inside the child component.
Pretty easy right? But the same cannot be said for another type of interaction. Let us look at that.
Child-to-Parent Interaction:
When sending data from Parent to child, it is easy because the parent knows who the child is. To make terms clear, the child element is inside the HTML of the parent element. But the child does not know who the parent is. The child element does not have the reference of the parent and that is the problem.
What the child will do is the child will emit the event of sending the message. For that, we will be creating an EventEmitter object along with Output Decorator. Thus in the TS file of child:
// Emitter object -> used to emit (send) events
  @Output() emitterObj = new EventEmitter();
Later we make changes in the HTML of the parent component, signaling the emission of an event.
<app-child (emitterObj)="childData=$event" [pData]="myData"></app-child>
As declared in the TS file of a parent, we will catch the event which is emitted and store it in "childData" variable.
Meanwhile, in the HTML component of a child, we create the same form:
{{ pData }} <!--Message from parent will be printed-->
<form>
    <label>Send a Message from Child to Parent : </label>
    <input type="text" name="" #cMsg>
    <button class="btn btn-primary" (click) = "getMsg(cMsg.value)">Send Message</button>

</form>
In the TS file of child:
getMsg(data:any){
    console.log(data)
    this.emitterObj.emit(data)
  }
This was personally the most confusing topic of Angular I have ever come across. Yet even though if any viewer found the above demonstration confusing, I will try to summarize things with a simple diagram:

Thus we learned about Decorators.

