Day 8: MongoDB - Sharding

Developer based in India. Passionate learner and blogger. All blogs are basically Notes of Tech Learning Journey.
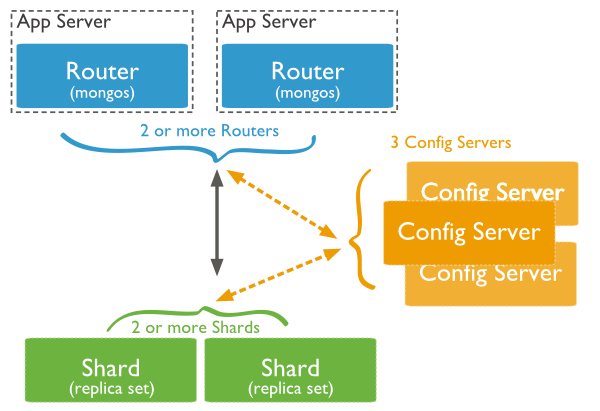
In this article, we will explore the powerful concepts of Sharding and Scalability in MongoDB. Sharding enables horizontal scaling, distributing data across multiple servers or shards, to handle large amounts of data and high read/write loads. This ensures that MongoDB can efficiently manage growing data and maintain high performance.
What exactly is Sharding?
Sharding is the process of distributing data across multiple servers or shards. Each shard contains a subset of the data, allowing MongoDB to parallelize read and write operations, resulting in improved performance and handling vast amounts of data.
Why choose Sharding over Replication?
Sometimes, a single machine may not be able to handle all the load. As we saw in Replication, all the write operation goes to the primary node. In case of a huge amount of data, this may not be possible for a single node to process a humongous size of data and replicate exactly forward to secondary nodes. Sharding provides horizontal scaling, allowing you to distribute data across multiple shards (servers) to handle large amounts of data and high read/write loads. As your data and application grow, you can add more shards to accommodate increased demands, ensuring seamless scalability.
Replication primarily focuses on data redundancy and fault tolerance but does not inherently address big data challenges. Sharding, on the other hand, is designed to efficiently manage vast amounts of data, making it well-suited for handling big data scenarios in MongoDB.
Sharding enhances read and write performance by distributing the load across multiple shards. Each shard can serve a portion of the data and handle independent read/write operations, leading to improved response times and overall performance.
While replication is essential for ensuring data redundancy, fault tolerance, and high availability within a single server, sharding takes MongoDB's scalability to a whole new level. Sharding enables horizontal scaling, improved performance, and efficient management of large datasets, making it the ideal solution for applications with rapidly growing data and high demands. By leveraging the advantages of sharding, you can create a robust, scalable, and high-performing MongoDB infrastructure to support your evolving application needs.
Let us try to implement Sharding in our system. You may also refer to the following link which greatly helped me with this below implementation of mine:
Click below to access the link:
https://csrepo.blogspot.com/2019/03/sharding-setup-in-mongo.html
Our implementation will have 2 shards and 3 databases. So we will create these folders in the "data" folder, which is located in our C directory.
For our implementation, we will use 3 config servers (config0 on 26051, config1 on 26052, and config2 on 26053) and 2 shard servers (shard1 and shard2).
Open the command prompt in the "bin" folder of the MongoDB server and use this command:
mongod --configsvr --port 26051 --replSet cfg --dbpath C:\data\config0 --bind_ip localhost
Similarly, start other config servers too.
mongod --configsvr --port 26052 --replSet cfg --dbpath C:\data\config1 --bind_ip localhost
mongod --configsvr --port 26053 --replSet cfg --dbpath C:\data\config2 --bind_ip localhost
Now our servers are started in the config mode. Now, connect to the first config server by using the following command:
mongosh -port 26051
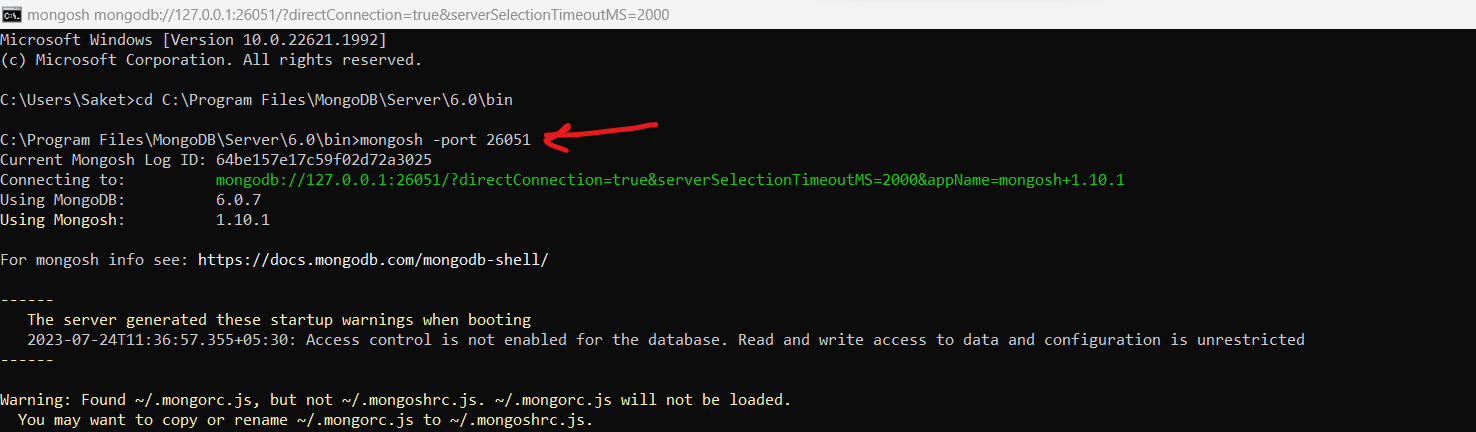
As it shows the above output, we can now verify if it has been initiated as config servers or not. We will use replica sets methods for that.
rs.initiate()

Later we used the "rs.add()" method to add the config servers to the primary config servers as secondary cluster servers. Now we use "rs.status()"
rs.status()


So far we have successfully initialized the config servers. Now we will move on to the shards.
mongod --shardsvr --port 27000 --replSet shard1 --dbpath C:\data\shard10 --bind_ip localhost
mongod --shardsvr --port 27001 --replSet shard1 --dbpath C:\data\shard11 --bind_ip localhost
mongod --shardsvr --port 27002 --replSet shard1 --dbpath C:\data\shard12 --bind_ip localhost
mongod --shardsvr --port 27100 --replSet shard2 --dbpath C:\data\shard21 --bind_ip localhost
mongod --shardsvr --port 27101 --replSet shard2 --dbpath C:\data\shard22 --bind_ip localhost
mongod --shardsvr --port 27102 --replSet shard2 --dbpath C:\data\shard23 --bind_ip localhost

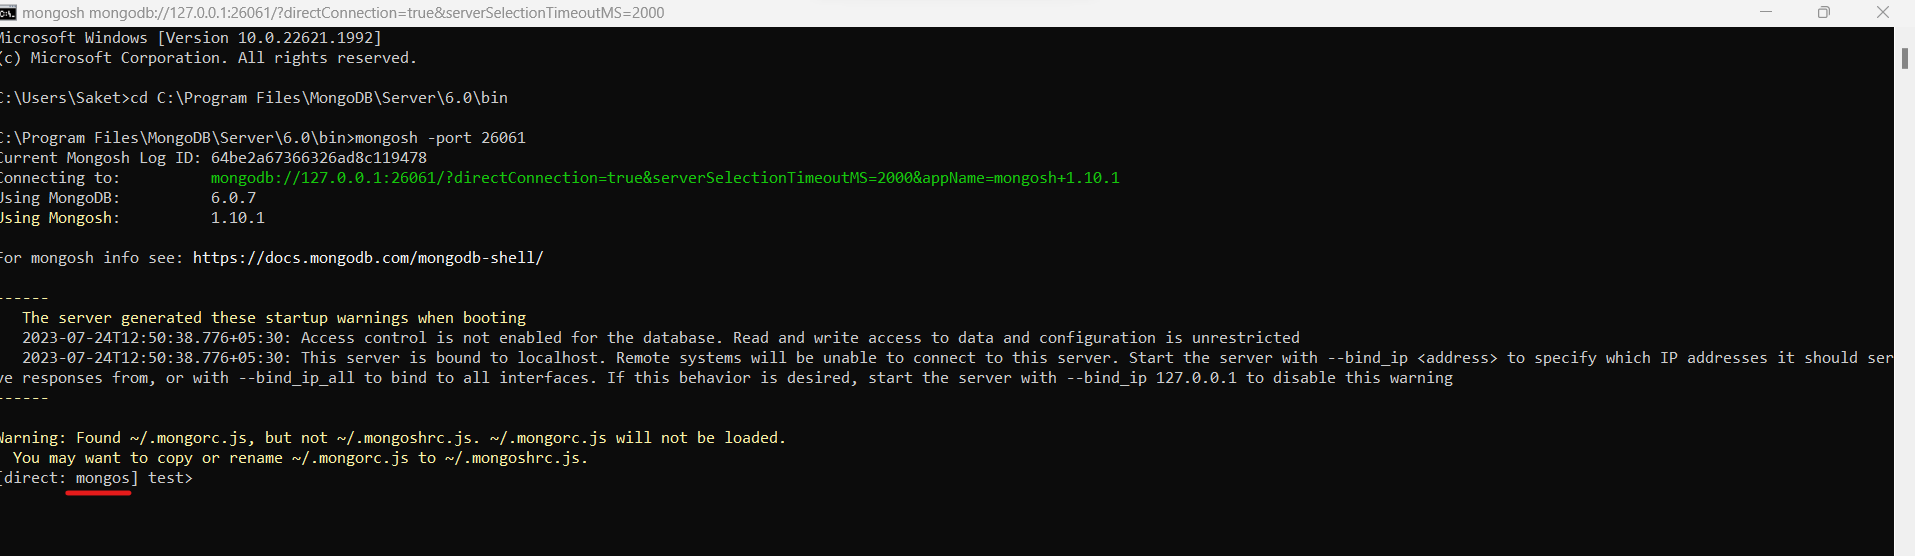
As you can see now, we have started over shard servers. Now, time to use "mongos" command. It acts as a query router, directing client requests to the appropriate shards based on the sharding key. These will be the interaction point for the client with the sharding environment.
mongos --configdb "cfg/localhost:26051,localhost:26052,localhost:26053" --port 26061
The "cfg" is the name of our replica set. The "configdb" parameter specifies the config servers for the sharded cluster. Likewise, you may start multiple instances of "mongos" in order to increase the availability. In our above case, we have successfully started the "mongos" instance on port 26061. You may keep any number as you wish.
Now it is time to start shard replica sets. Follow the below steps and run these lines one by one.
mongosh -port 27000

rs.initiate();

rs.add("localhost:27001");
rs.add("localhost:27002");

rs.status();
Similarly, do the same thing for the other shard server too.
mongosh -port 27100

rs.initiate();

rs.add("localhost:27101");
rs.add("localhost:27102");

rs.status();
Now we will use the "mongos" instance to add the shards. As we discussed we will be using the mongos to interact with this sharding system. To connect to our mongos system, use this command as usual:
mongosh -port 26061
Now, we will add the shards.
sh.addShard("shard1/localhost:27000");
sh.addShard("shard2/localhost:27100");

Now, check the status.
sh.status();

Now we will add a database with sharding enabled already. In case you do not have a database with the name you will specify, it will automatically be created. For example:
sh.enableSharding("mydb")

Now, to confirm if really the database has been created with sharding capabilities, we use "sh.status()" again.

Thus, we have successfully implemented sharding in our system. As a part of advanced learning, we may also share a particular database collection if you wish. But our objective was to implement sharding and demonstrate the whole process. Click on the link I posted earlier in this article to know more things about sharding.
Congratulations! You have successfully implemented sharding in MongoDB on your system. By following these step-by-step instructions and using the provided code, you have set up a sharded cluster with multiple shards, a config server, and a mongos router. Sharding allows you to scale your MongoDB infrastructure horizontally, efficiently handle large datasets, and improve read and write performance. Now you can leverage the power of sharding to support your growing data and ensure high availability and performance for your MongoDB databases.


